
Jeep JK Stainless Steel Extended Brake Lines
0 The most common situation when extended brake lines are necessary is when you install a lift on your Jeep. The distance between the frame/body of the Jeep and axles increases after a suspension lift, therefore longer brake lines are required during articulation. You might also want to replace your stock rubber brake lines with stainless steel braided brake lines when you realize that the stock lines are deteriorating due to weather conditions (very high temperatures in the summer or lots of salt on the road due to ice and snow in the winter) and when you begin noticing a much softer, spongy brake pedal feel. That feeling is most likely due to moisture getting into the brake lines, which leads to reduced boiling point of the fluid and forming of air bubbles, as well as corrosion of the metal components of the system and consequently contamination of the fluid.
Any time you open up the brake system, like when you replace the flexible brake lines, you must perform a proper bleeding procedure. When bleeding the brakes you will need to add more fluid to your master cylinder. I would suggest that while you’re at it, you might as well flush the entire braking system and replace all the brake fluid with fresh one. It is actually recommended that modern vehicles have their brake fluid replaced once every 2 years.
This is due to the fact that most cars today use DOT brake fluid, and the characteristics of that fluid.
DOT brake fluid is hygroscopic, which means it attracts moisture. Over time brake fluid will accumulate a certain amount of moisture; a study by the National Highway Traffic Safety Administration found that 20 percent of the cars they tested had brake fluid with 5-percent moisture content. A 3-percent moisture content in DOT 3 brake fluid reduces the boiling point of the fluid by more than 100 degrees.
When moisture in the brake fluid boils because of the tremendous amount of heat generated by the brakes, you can actually lose the ability to stop. In addition to that, the moisture can cause corrosion of the wheel cylinders or brake calipers and eventually cause a leak.
The other thing to watch out for is dirty fluid. Brake fluid can get very dirty if left unchanged year after year. I have seen some master cylinders that look as if they were filled with mud.
With newer model vehicles like the Jeep JK, most common issues stem from the levels of dissolved copper and depleted additive package in modern brake fluids. When the additive package of brake fluid is depleted, one of the negative results may be internal brake system component corrosion and sludge build up.
In this write-up I will be describing the procedure of replacing all four flex brake lines as well as flushing the entire brake system and bleeding the brakes. With brand new, extended stainless steel flex lines and fresh brake fluid flowing thru the entire brake system, as well as replaced brake pads and new, larger brake rotors (see my post), my Jeep’s brakes are going to work as new again. I am performing a complete brake system overhaul in preparation for a suspension lift, to make sure I can confidently drive my lifted Jeep on a daily basis, as well as enjoy wheeling it over some fun obstacles.
Disclaimer: Like I always mention I am not a professional mechanic, I just try to do as much work on my Jeep as possible. It helps me learn more about my vehicle and save some money that can be spent on parts and upgrades.
I take no responsibility for any injury or breakage which might occur if you decide to follow these steps. You have to decide if you’re comfortable working on your Jeep. If you’re not, please have a professional complete this project for you.
As an Amazon Associate I earn commission from qualifying purchases. It allows me to offer contents of this website free of charge to everyone.
Parts and tools needed:
1. Rear Brake Line Kit with Hardware and Front Brake Line Kit with Hardware
2. TeraFlex JK Front Brake Line Anchors (optional)
4. 500ml Plastic Bottle and Plastic Hose
6. Turkey Baster or Plastic Syringe
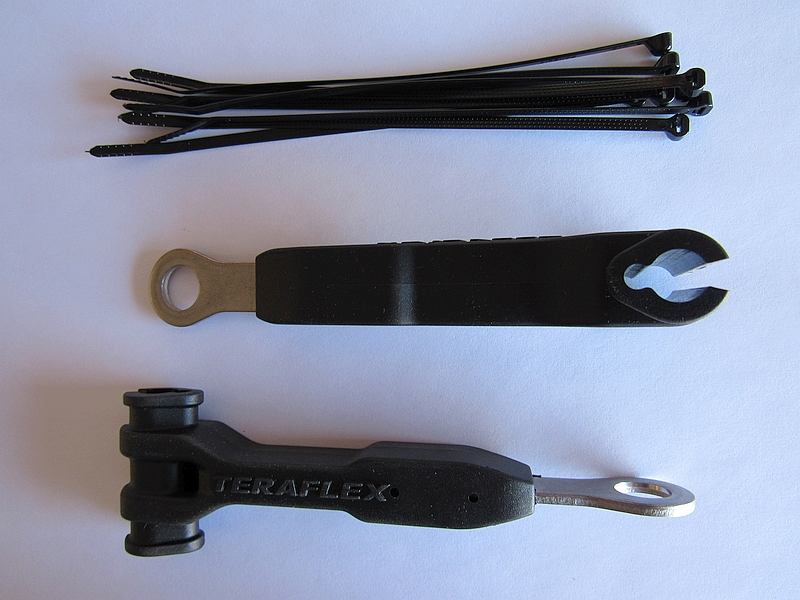
7. Zip Ties
10. Drain Pan
11. Tongue and Groove Pliers and Hammer
12. 3/8-Inch Drive Ratchet and Socket Set
13. Pry Bar or a Flat Screwdriver
14. 1 in. x 14 ft. Ratcheting Tie Down Strap (optional)
15. Brake Cleaner
16. Shop Towels or Paper Towels
Procedure:
Step 1:
Prepare your tools and get everything ready before you start the project. Park your Jeep on a level surface, apply your emergency brake and put your transmission in park or in gear if you have a 6-speed manual transmission. Chock the front wheels.
Step 2:
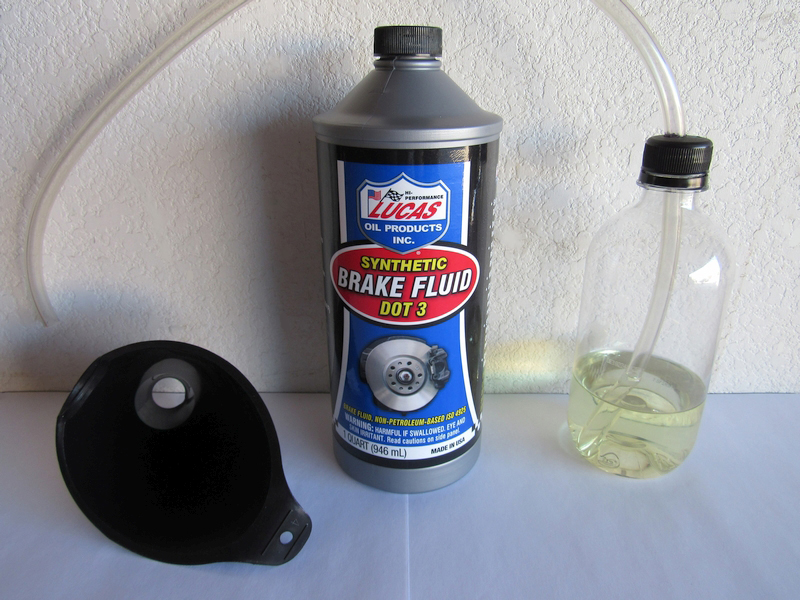
Make sure you have enough fresh brake fluid to complete the project. 1 quart should be just the right amount to replace all the brake fluid in the system for all four brakes.
You can construct your own brake bleeder kit using a clean 500ml plastic bottle (find one made from hard plastic if you can), about 30″ of 3/8″ OD clear hose and a zip tie.
Turkey baster or large syringe will be needed to remove some of the old brake fluid from master cylinder, and a funnel will help with adding fresh brake fluid to top off the master cylinder.
Step 3:
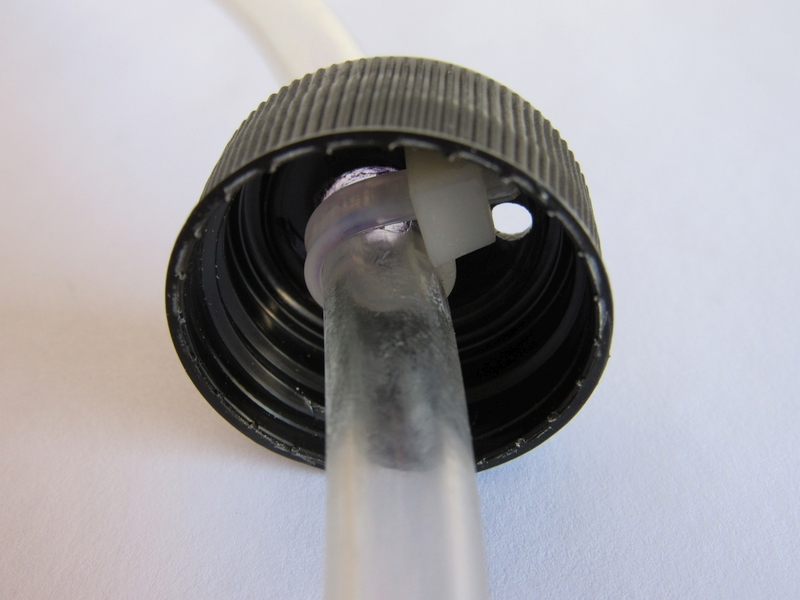
Drill a 3/8″ hole in the water bottle cap and feed enough hose thru to have it touch the bottom of the bottle. Drill a second, smaller vent hole in the cap. In order to prevent the hose from coming out of the bottle, place a zip tie in the location right under the cap (you can glue it to the hose if it keeps sliding).
Fill the bottle 1/4 of the way with fresh brake fluid. It is important that the hose stays submerged in the fluid and doesn’t come out throughout the entire bleeding process.
Step 4:
If you are replacing all four brake lines or want to flush the entire brake line system, you will need to start this job from the passenger side rear brake. If you are only working on your front brake lines, then you need to start at your passenger side front brake.
The idea is that you need to start from the brake that is farthest from the master cylinder.
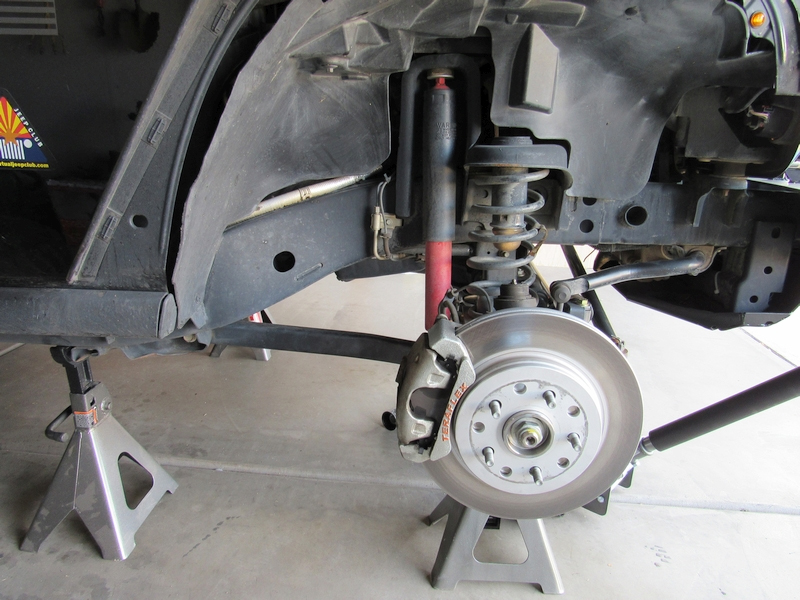
Lift the rear axle and rest it on at least two jack stands. Remove both wheels.
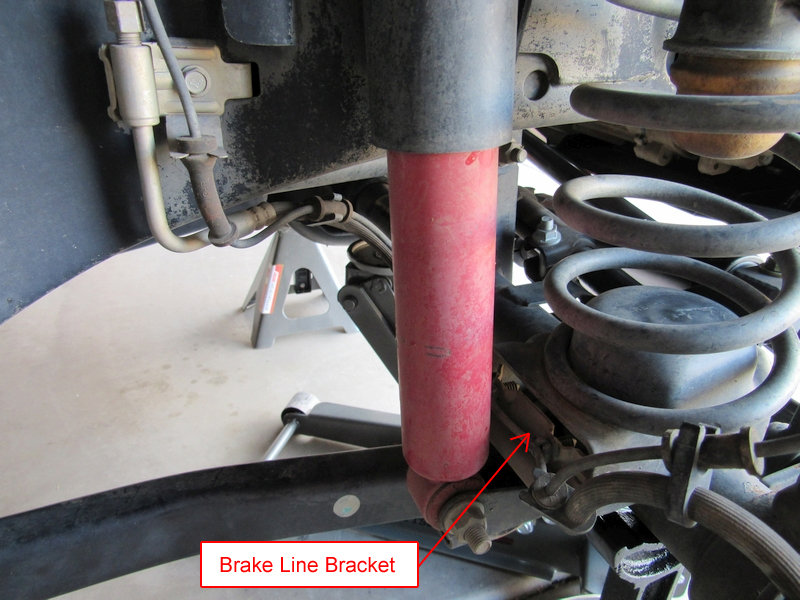
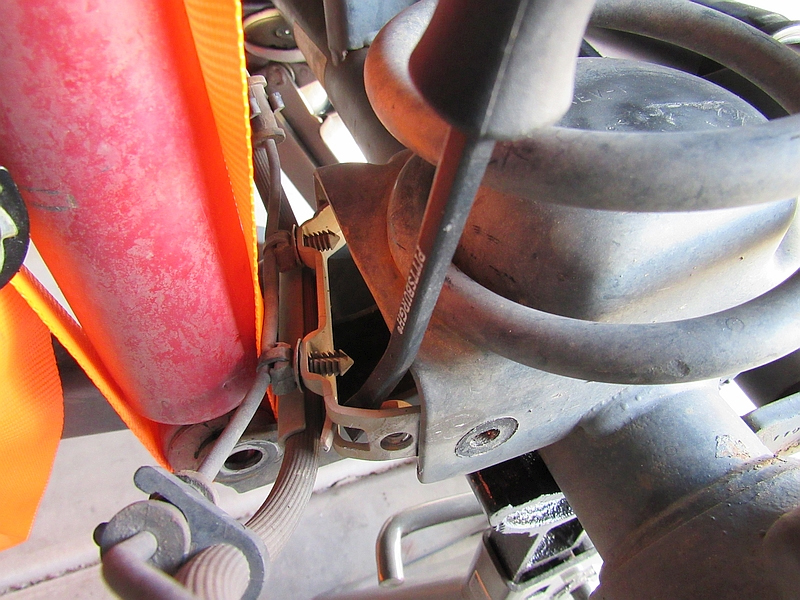
Locate the flexible section of brake line that will be replaced with new stainless steel extended line. You can start disconnecting at either the frame bracket or at the banjo bolt. I would suggest starting with the frame bracket end, since you might be able to stop the fluid from dripping sooner and limit the mess.
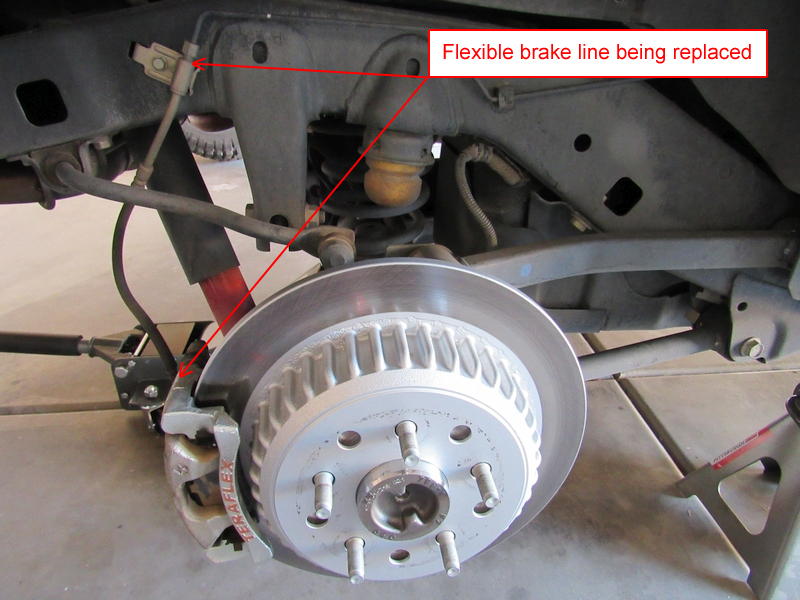
Step 5:
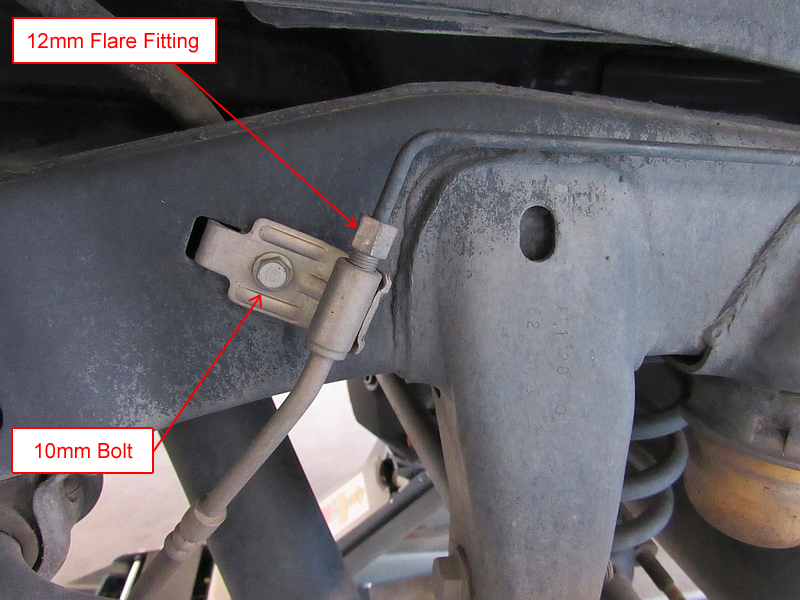
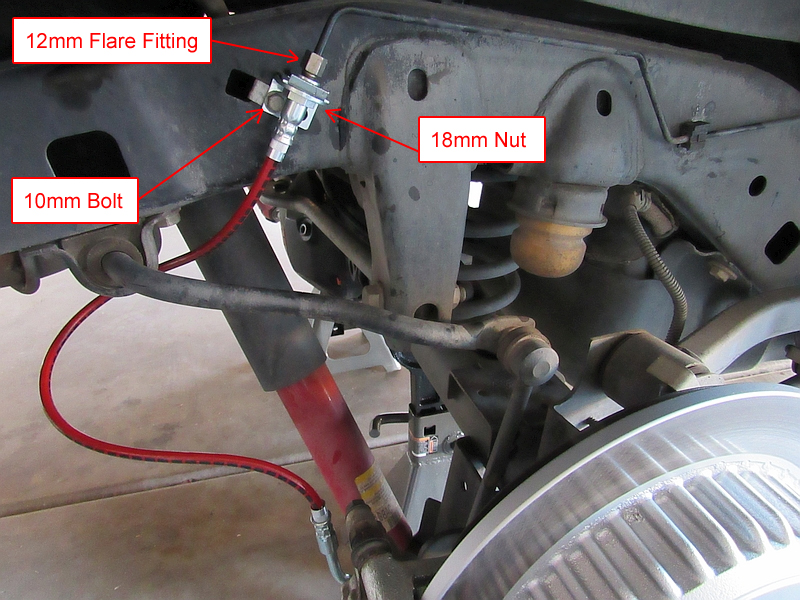
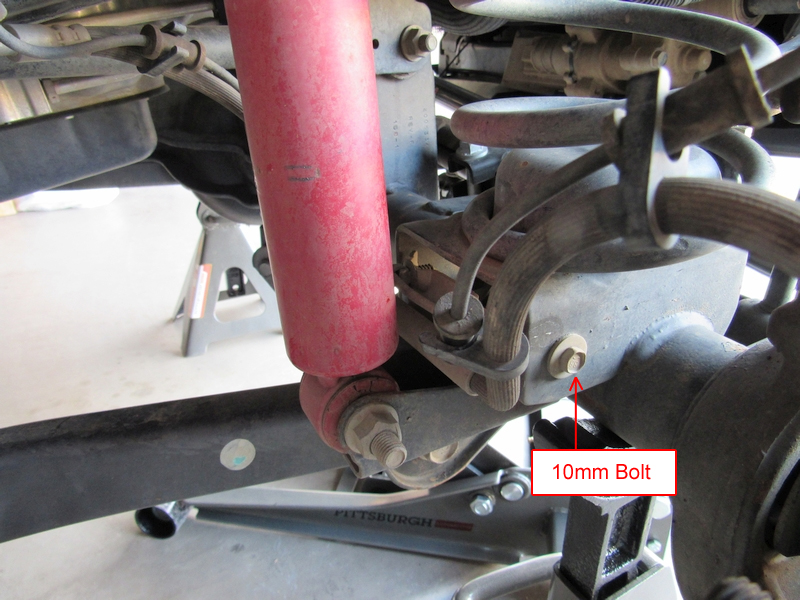
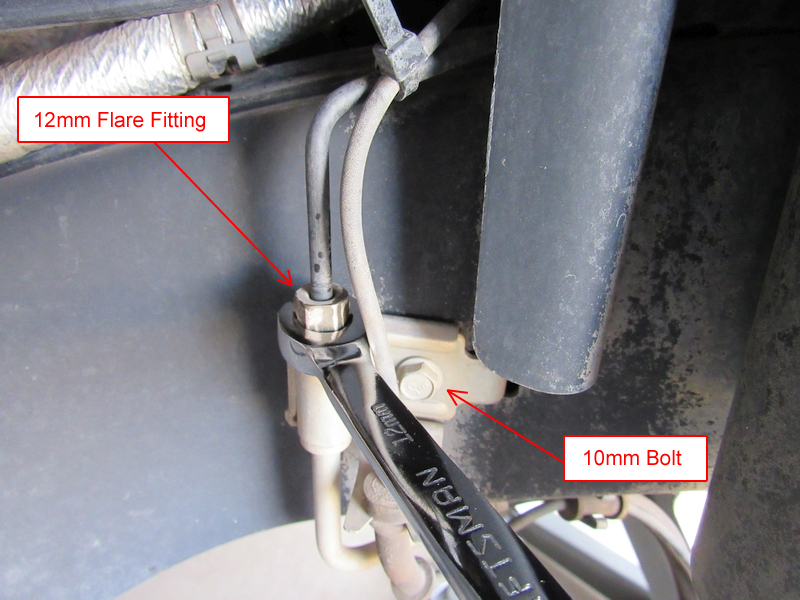
Loosen the 12mm flare fitting connecting the flex line and bracket to the solid brake line. Remove the 10mm bracket bolt.
Disconnect stock flex line from the solid line completely.
Step 6:
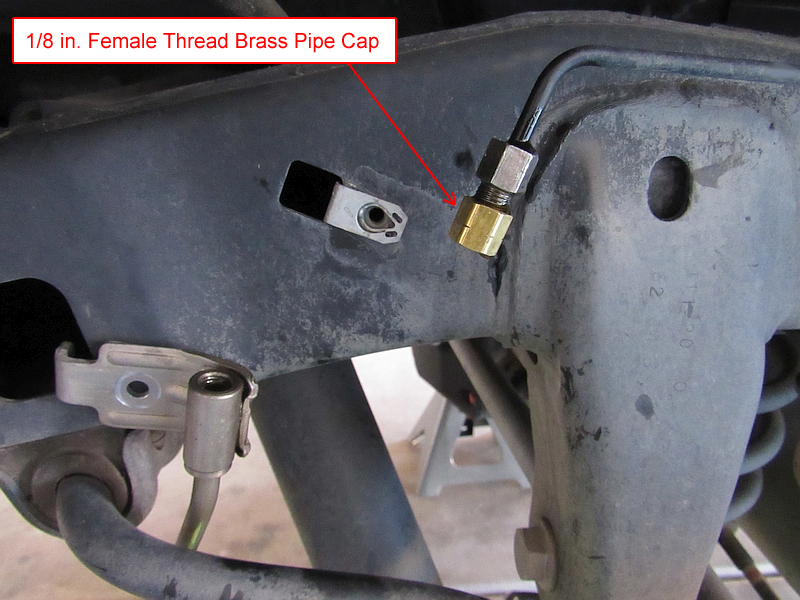
After disconnecting the stock flex line, you can either connect your new extended line immediately and lift the other end of it as high as possible, or you can use a 1/8″ female thread brass pipe cap to stop the brake fluid from dripping out of the brake lines (do not over tighten or you could damage the threads).
Step 7:
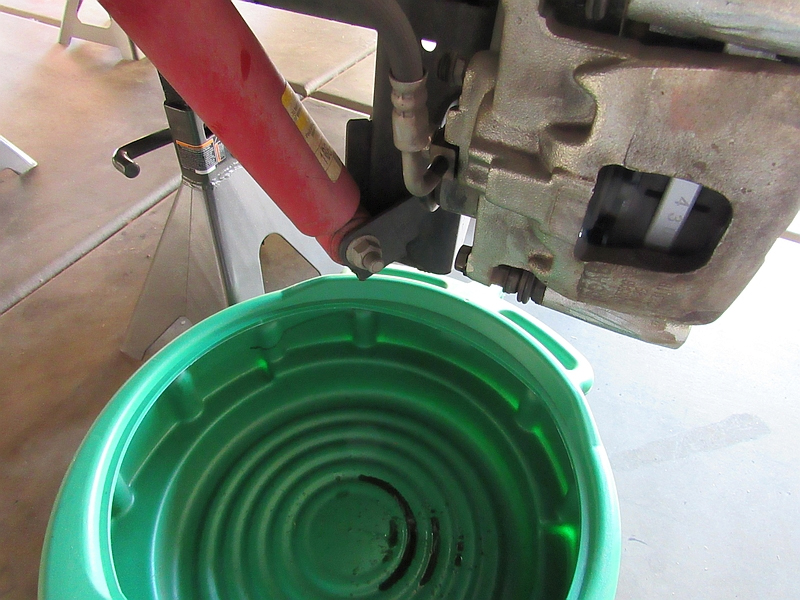
Place a drain pan underneath the brake caliper.
Step 8:
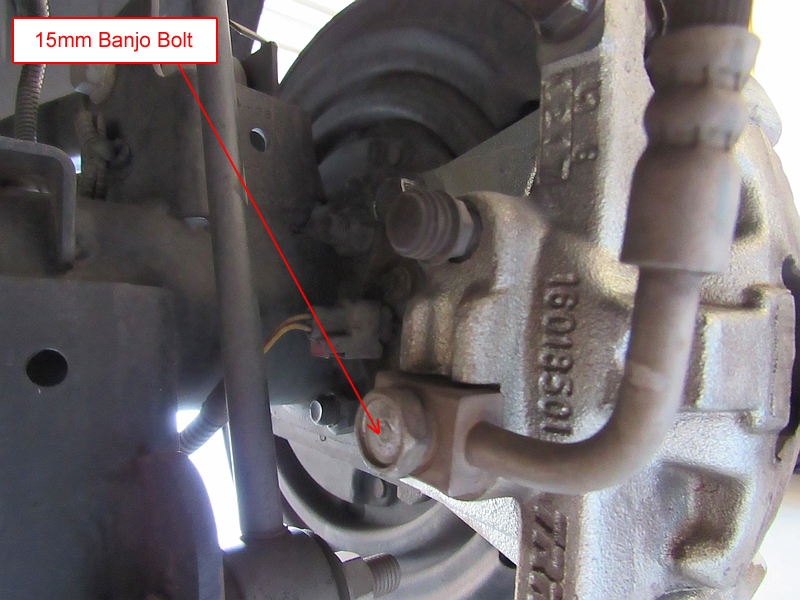
Carefully remove the banjo bolt. I would suggest using a flare nut wrench in order to prevent damage to the bolt.
Let the fluid drain out of the flex line and brake caliper.
Step 9:
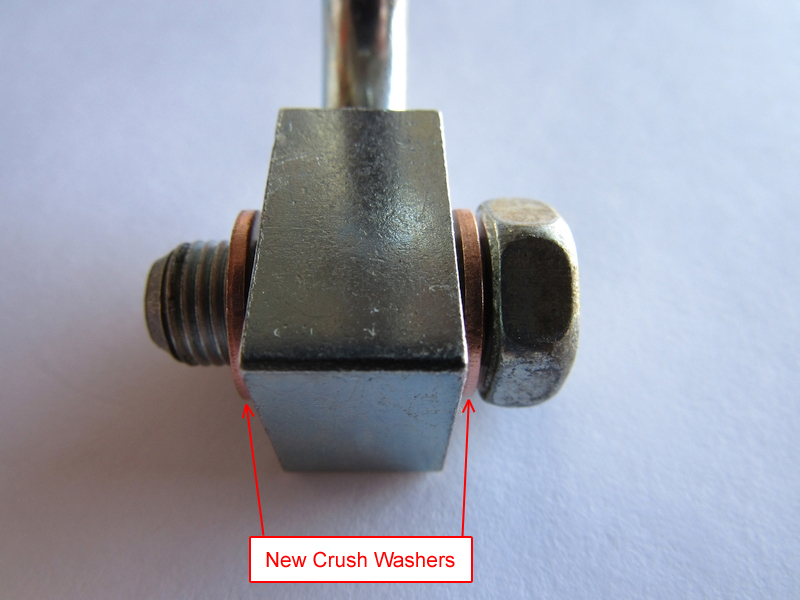
Clean the banjo bolt with brake cleaner and install new copper crush washers as pictured.

Step 10:
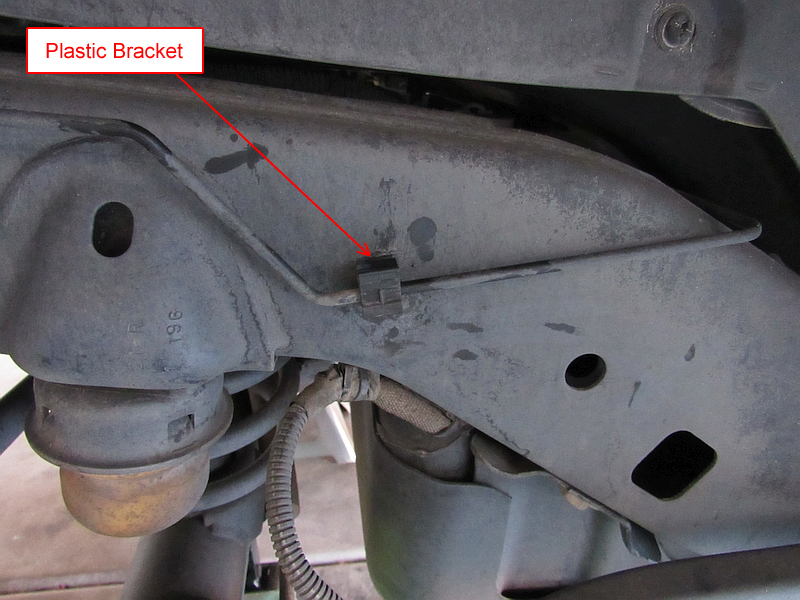
In order to properly connect your new extended brake line and new frame bracket to the solid brake line, you might have to push the solid brake line towards the rear of the Jeep. The line is supported with a plastic bracket but it will slide thru with a little bit of force.
Step 11:
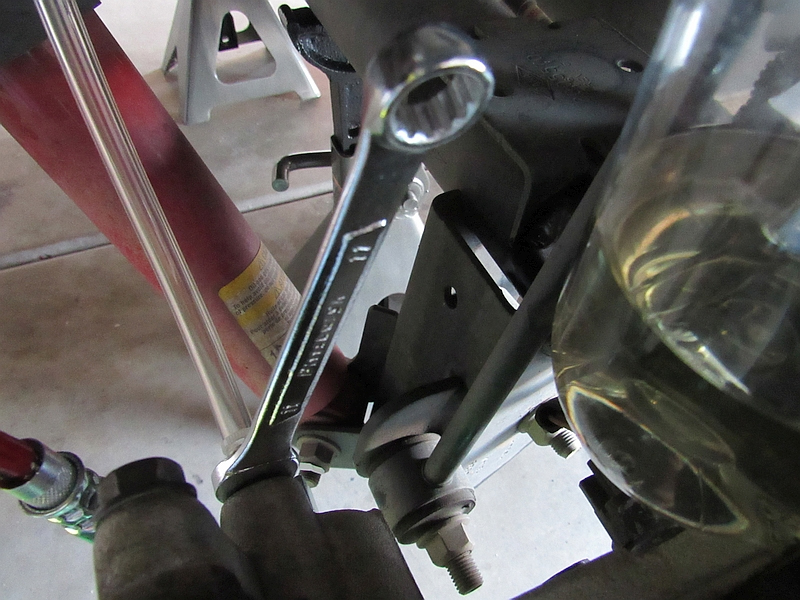
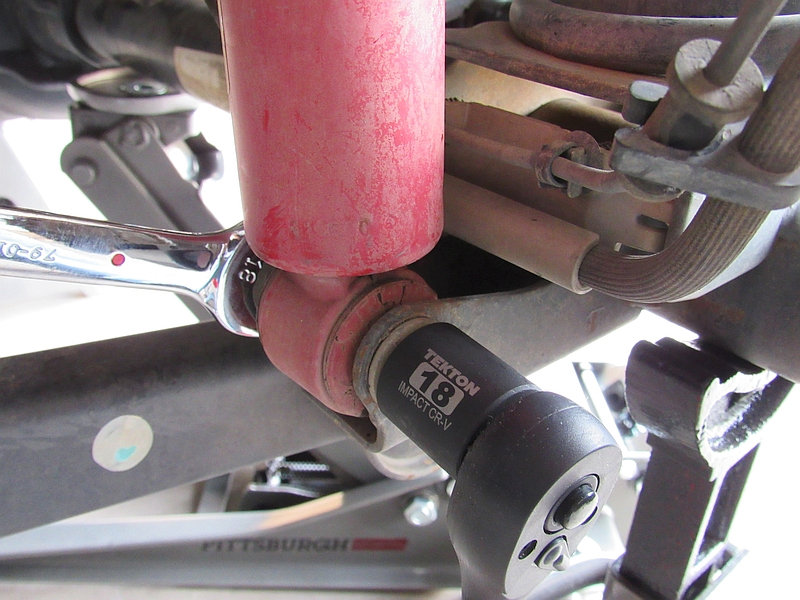
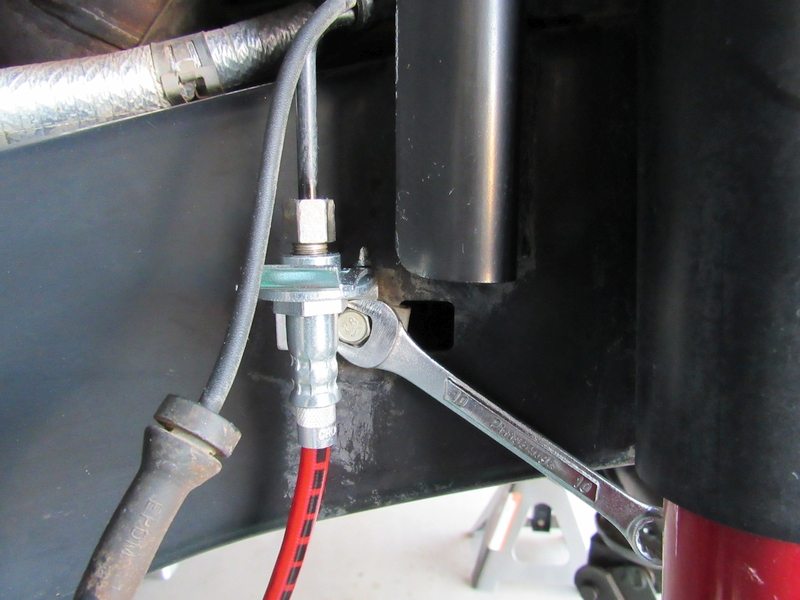
Align everything and tighten the 12mm fitting, while holding the new bottom nut with an 18mm open end wrench. Tighten frame bracket’s 10mm bolt.
Step 12:
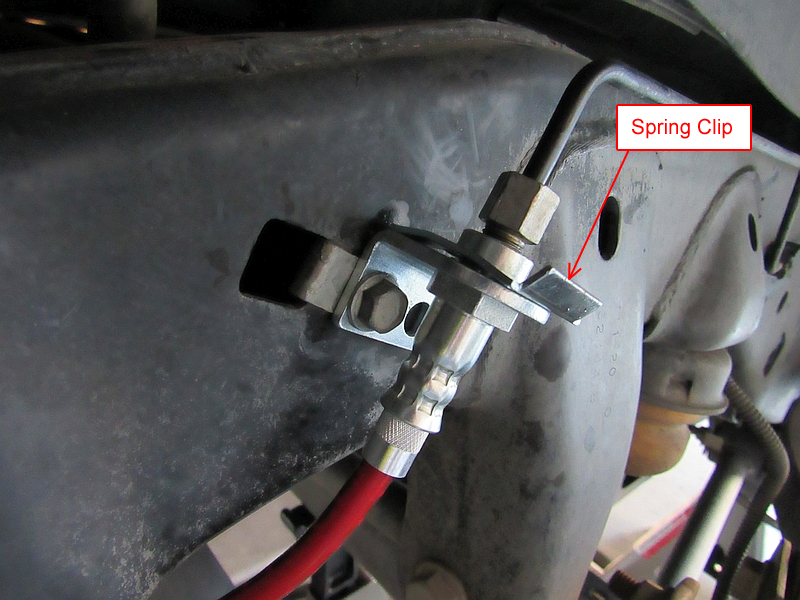
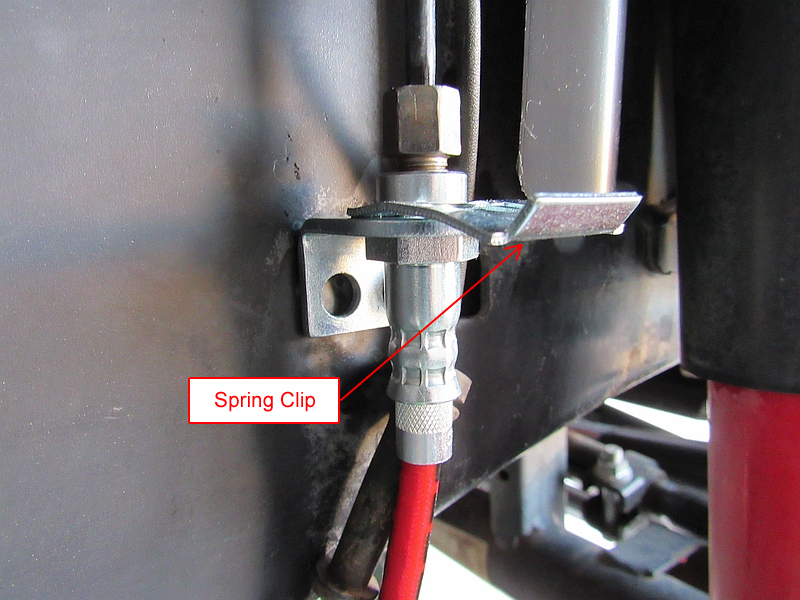
Push in the provided spring clip. Gently tap with a hammer if necessary or carefully use a pair of tongue and groove pliers.
With everything tighten and spring clip in place, the connection should feel solid and secure.
Step 13:
Connect the other end of your new, extended flex brake line to the brake caliper (make sure brake line is not twisted). Catch the banjo bolt by hand to prevent cross threading, and tighten to 23 ft. lbs.
You are now ready to begin the flushing and bleeding procedure for the passenger side rear brake.
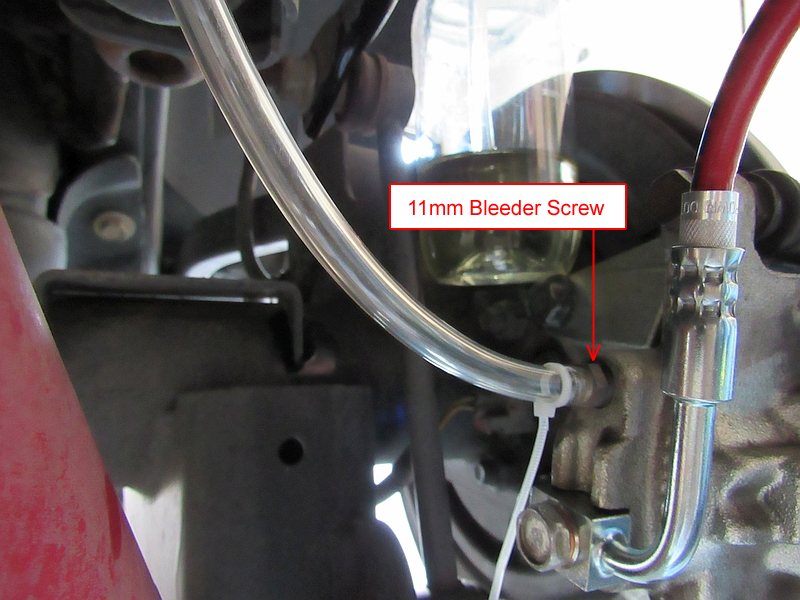
Remove the rubber cap attached to the brake caliper bleeder valve. Push the hose onto the valve and place a 11mm wrench on the brake caliper bleeder screw.
Step 14:
Place your plastic bottle in a secure, stable location, above the level of the caliper bleeder valve.
Step 15:
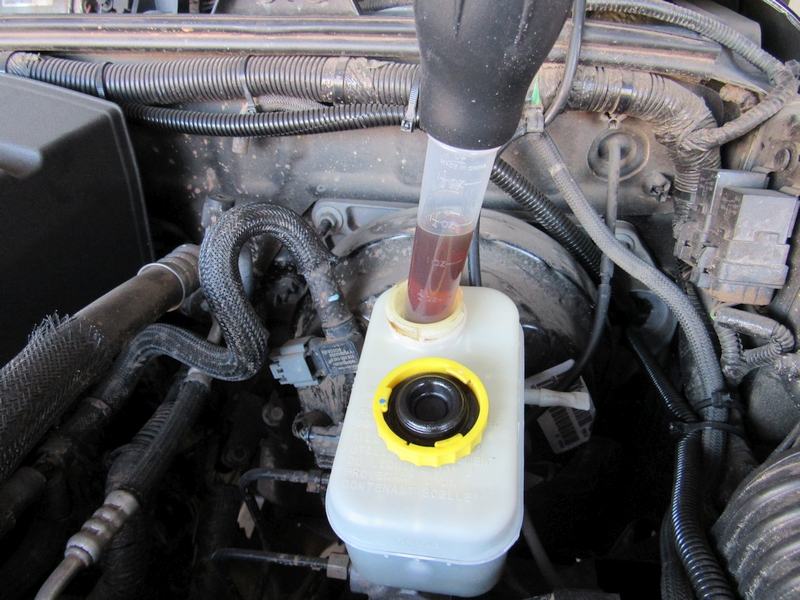
Clean your master cylinder to prevent any dirt or contaminants from getting into the fluid and possibly clogging brake lines.
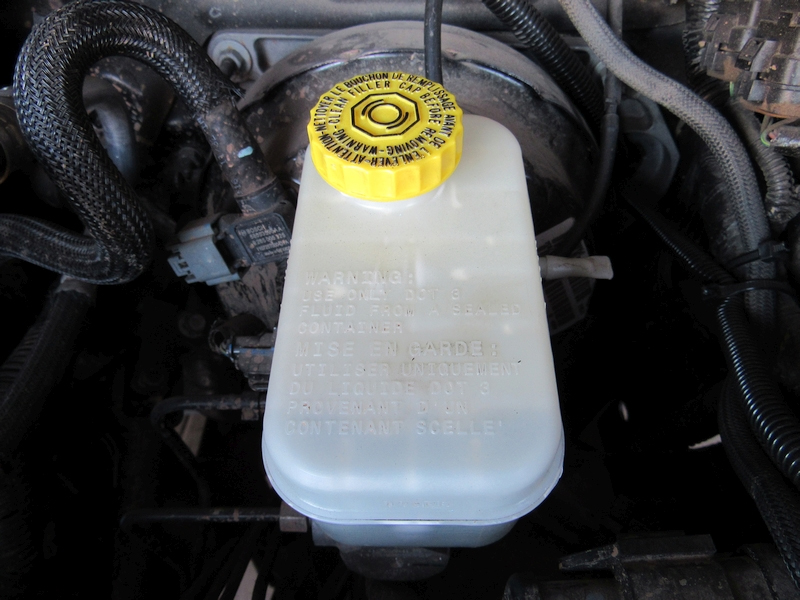
Step 16:
Using a turkey baster or a large syringe, remove some of the old brake fluid from master cylinder. Do not empty the entire master cylinder since it will introduce air into the brake system, which will need to be pushed thru the entire length of brake lines.
Slowly top off the master cylinder with fresh fluid and close the cap.
Step 17:
Depending on your situation, you can perform a two-person or a one-person brake bleeding procedure.
If you do have a helper, ask them to hop into the Jeep and depress brake pedal few times while you operate the wrench on the bleeder valve and observe the fluid flowing thru the hose.
In this example I performed a one-person bleeding procedure. It means you do both the brake pedal depressing and checking the fluid coming out of the caliper and flowing thru the hose, as well as making sure the master cylinder in being topped off with fresh brake fluid.
Open the bleeder valve with the 11mm wrench. Turn the valve screw only about 1/4 of a turn, since loosening it too much will cause the brake fluid to leak out and air to come in which defeats the purpose of bleeding the lines.
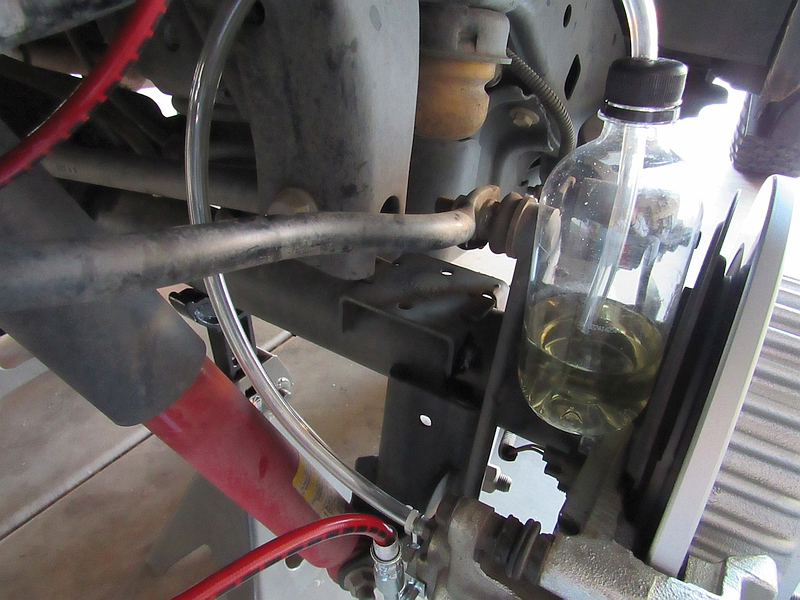
Leave the bleeder valve open, get behind the wheel of your Jeep and depress brake pedal five times. Get out and check the fluid going thru the hose. Old fluid will be really dark and there will be air being pushed out.
Keep depressing the brake pedal five times at once, go back and make sure that master cylinder is refilled (it is very important to NOT let your master cylinder run dry during this process), and check if the fluid flowing thru the hose becomes clearer, with no air pockets.
Once the fluid coming out of the caliper and thru the hose is clear and there’s no air bubbles, you can close and tighten the caliper bleeder valve.
You can disconnect your bleeder kit and put the rubber cap back on the bleeder valve. Check to make sure there is no leaks from the banjo bolt. Tighten the bolt if necessary.
Passenger side rear brake is the farthest from master cylinder, therefore it will take the longest to push fresh fluid thru the lines.
Driver side rear brake should take a bit less time to flush and bleed.
Once you finish bleeding both rear brakes, you can put the wheels back on and lower your Jeep to the ground. I would recommend doing a quick test drive to make sure everything works correctly, before moving on to the front brakes.
Step 18:
Park on an even surface and chock the rear wheels. Lift the front axle and rest it on at least two jack stands. Remove both wheels.
Step 19:
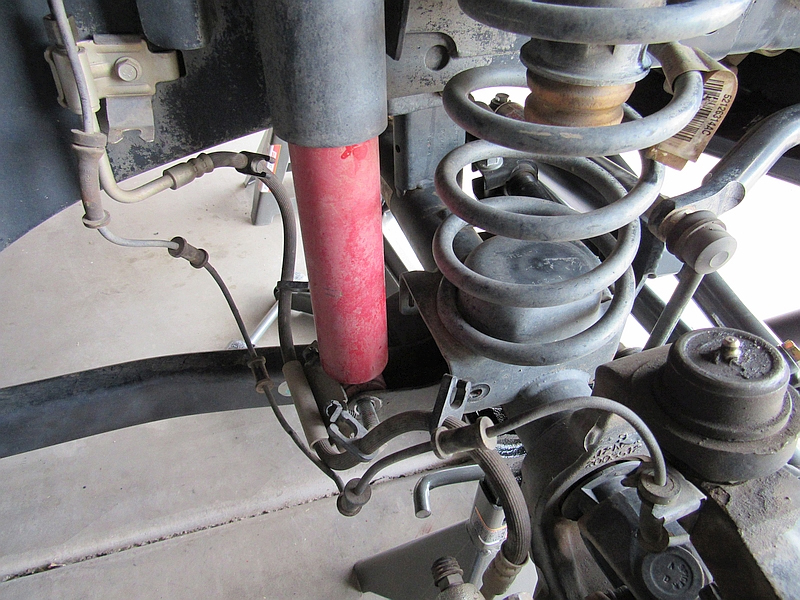
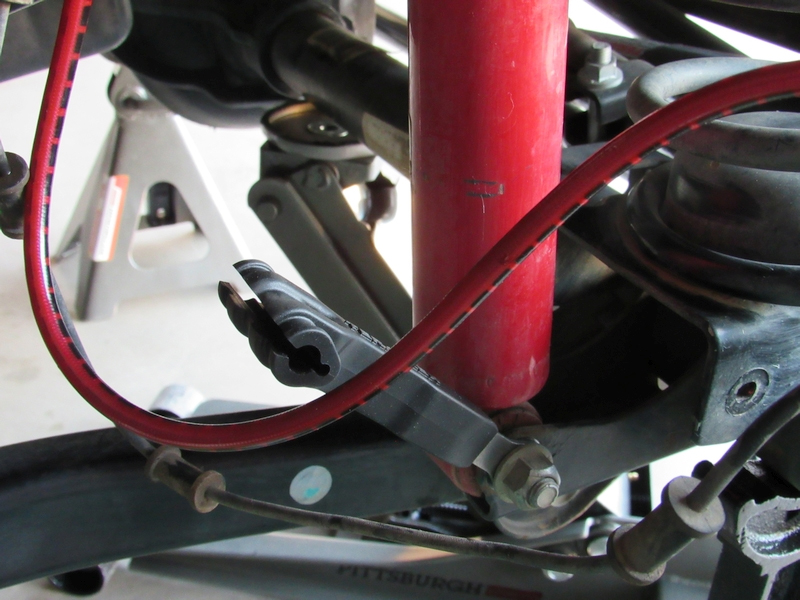
Front stock flex brake line in attached to a bracket, located between the shock and coil spring. I would suggest uninstalling the bracket and transferring the entire brake line to the other side of the shock. That means the shock’s bottom bolt needs to be removed and brake line needs to go around bottom of the shock.
Step 20:
Remove the bracket’s 10mm bolt.
Step 21:
Remove the nut from shock’s bottom bolt, using an 18mm socket and 18mm wrench to keep the bolt from spinning.
Step 22:
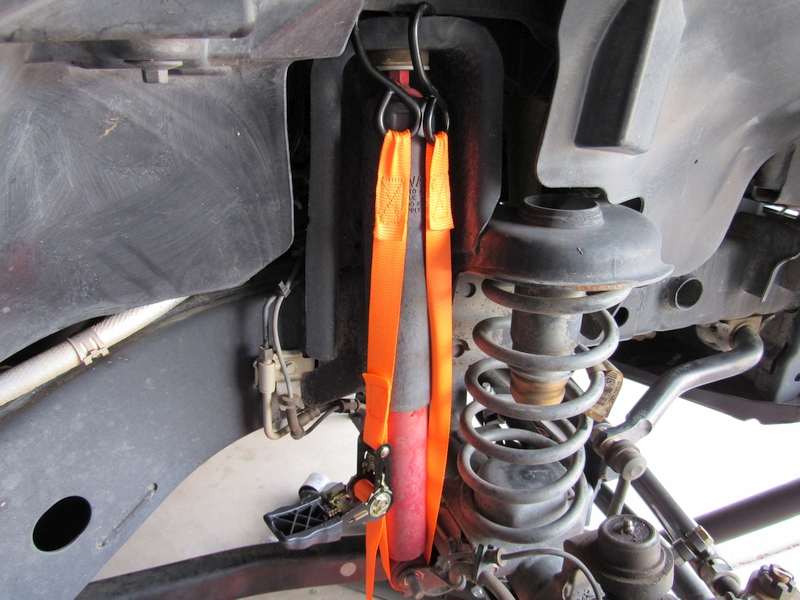
You can use a 1″ wide ratcheting strap to keep the shock from fully extending once removed from lower mounting bracket, which will help with re-installing bottom bracket bolt when you’re done moving the brake line.
Step 23:
Remove the brake line bracket, starting from the bolt side, and transfer the entire brake line assembly to the other side of the shock, carefully going around the bottom of the shock.
Step 24:
Align the shock back into mounting bracket and install the bolt.
Disconnect the ABS line from brake line.
Step 25:
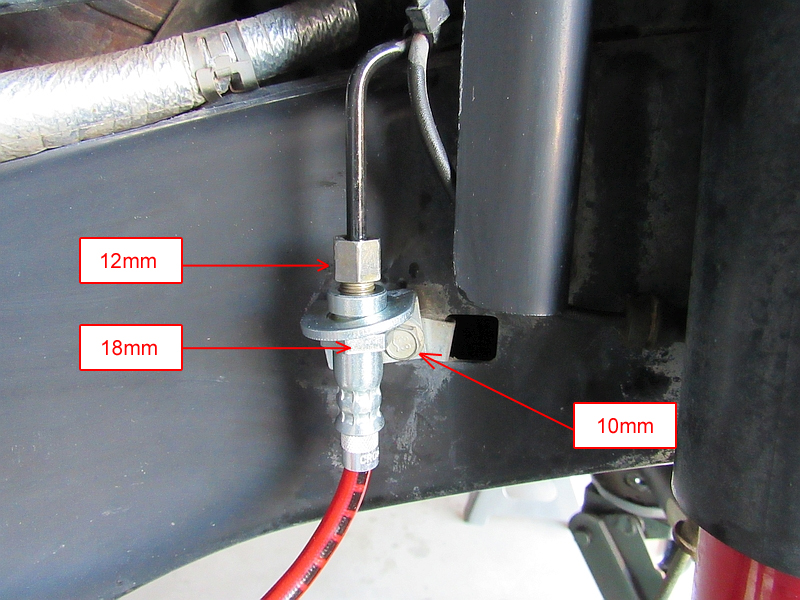
Loosen the 12mm flare fitting connecting flex line and bracket to the solid brake line. Remove the 10mm bracket bolt.
Disconnect stock flex line from solid line completely.
Step 26:
After disconnecting the stock flex line, connect your new extended flex line immediately and lift the other end of it as high as possible.
Your new flex line goes thru the new L-shape bracket and connects to the flare fitting. Align everything and tighten the 12mm fitting, while holding the new bottom nut with an 18mm open end wrench.
Step 27:
Place a drain pan underneath the front brake caliper.
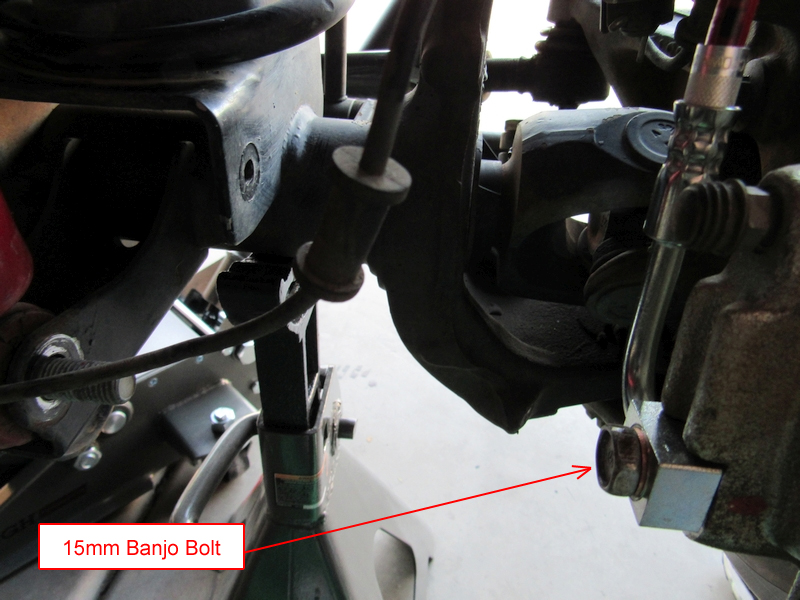
Carefully unscrew the banjo bolt. I would suggest using a 15mm flare nut wrench in order to prevent damage to the bolt.
Let the fluid drain out of the flex line and brake caliper.
Clean the banjo bolt with brake cleaner and install new copper crush washers as pictured.
Step 28:
Connect the other end of your new, extended flex brake line to the brake caliper (make sure brake line is not twisted). Catch the banjo bolt by hand to prevent cross threading, and tighten to 23 ft. lbs.
Select best orientation of the elbow coming from the banjo bolt. You might want it to point towards the rear and up. I decided to install it towards the front and up, to align flex brake line with the ABS line better.
Step 29:
Push in the provided spring clip on top of your new frame bracket. Gently tap with a hammer if necessary or carefully use a pair of tongue and groove pliers.
Step 30:
Tighten the frame bracket’s 10mm bolt. With everything tighten and spring clip in place, the connection should feel solid and secure.
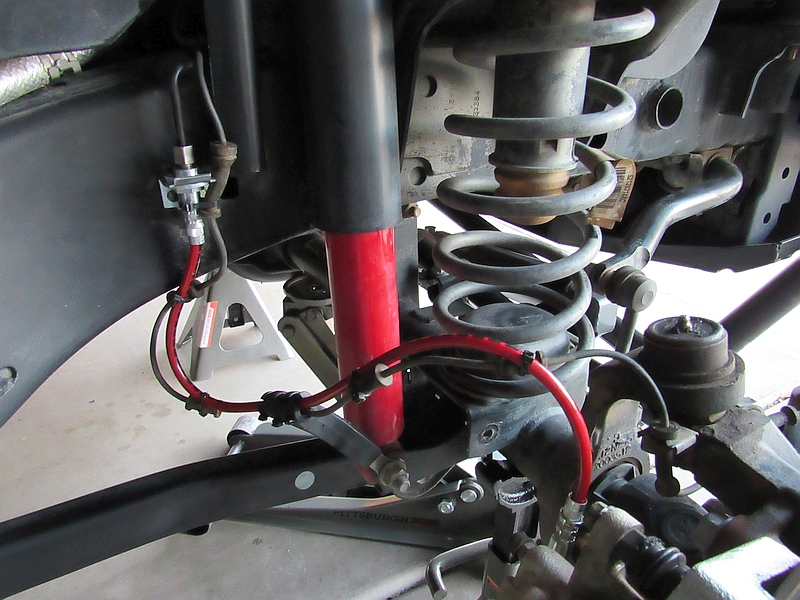
Connect the ABS line to brake line with a zip tie.
Step 31:
You can optionally install the TeraFlex JK Front Brake Line Anchors, as I decided to do. It’s flexible in all directions so it doesn’t restrict brake line movement while offroading.
Step 32:
Install the brake line anchor onto the lower shock bolt and tighten the nut to 56 ft. lbs.
Step 33:
Push the ABS line and brake line into the anchor and secure with three zip ties. Connect both lines together with few zip ties as well.
Step 34:
You are now ready to begin the flushing and bleeding procedure for the passenger side front brake.
Remove the rubber cap attached to the brake caliper bleeder valve. Push the hose onto the valve (you might want to cut off 1/2″ of the hose to make sure the end is tight) and place a 11mm wrench on the brake caliper bleeder screw.
Place your plastic bottle in a secure, stable location, above the level of the caliper bleeder valve.
Open the bleeder valve with the 11mm wrench. Turn the valve screw only about 1/4 of a turn.
Leave the bleeder valve open, get behind the wheel of your Jeep and depress brake pedal five times. Get out and check the fluid going thru the hose. Old fluid will be really dark and there will be air being pushed out.
Keep depressing the brake pedal five times at once, go back and make sure that master cylinder is refilled (it is very important to NOT let your master cylinder run dry during this process), and check if the fluid flowing thru the hose becomes clearer, with no air pockets.
Once the fluid coming out of the caliper and thru the hose is clear and there’s no air bubbles, you can close and tighten the caliper bleeder valve.
You can disconnect your bleeder kit and put the rubber cap back on the bleeder valve. Check to make sure there is no leaks from the banjo bolt. Tighten the bolt if necessary.
Repeat same steps with the driver side brake lines, as well as flushing and bleeding procedure.
Once you finish bleeding both front brakes, you can put the wheels back on and lower your Jeep to the ground. Do a quick test drive to make sure everything works correctly (brake pedal should feel firm, and there should be no leaks at any connection points – keep checking the next few days).
Congratulations, you now have brand new extended brake lines, and fresh fluid flowing thru your Jeep’s braking system.
If you have any questions or suggestions, feel free to comment below.